配置 SSH 1 2 3 4 5 # 一轮回车到底,在用户目录下 .ssh文件夹下 $ ssh-keygen -t rsa -C "hyp.712@163.com" # 查看sh公钥 $ cat ~/.ssh/id_rsa.pub
查看全部配置 1 2 3 4 5 6 7 8 9 10 11 12 13 14 $ git config -l user.name=brooks user.email=hyp.712@163.com color.ui=auto http.postbuffer=524288000 core.repositoryformatversion=0 core.filemode=true core.bare=false core.logallrefupdates=true remote.origin.url=git@xxx.git remote.origin.fetch=+refs/heads/*:refs/remotes/origin/* branch.master.remote=origin branch.master.merge=refs/heads/master
查看用户配置 1 2 3 4 5 6 $ git config --global -l user.name=brooks user.email=hyp.712@163.com color.ui=auto http.postbuffer=524288000
修改用户配置 1 2 $ git config --global user.name "输入你的用户名" $ git config --global user.email "输入你的邮箱"
仓库 初始化仓库 1 2 3 4 5 6 7 8 9 10 11 12 13 14 15 16 mkdir demo cd demo git init touch README.md git add README.md git commit -m "first commit" # 添加仓库地址 git remote add xxx.git #项目地址 git push -u origin master # 已有仓库 cd existing_git_repo git remote add origin xxx.git #项目地址 git push -u origin master
查看远程仓库地址 添加新的远程仓库 1 $ git remote add <remote> <url>
修改远程仓库地址 1 2 3 4 5 6 # 方法一:直接修改 git remote set-url origin [url] # 方法二:先删除再修改地址 git remote rm origin git remote add origin [url]
显示远程仓库信息 1 $ git remote show <remote>
关联本地和远程仓库 fatal: refusing to merge unrelated histories
1 2 # 解决方案: git pull origin master --allow-unrelated-histories
分支 查看本地分支 master 分支前的 * 字符,它表示当前所在的分支。
查看远程分支 列出所有分支(local&remote) 切换分支 创建并切换到新分支 1 $ git checkout -b <branch>
基于当前分支创建新分支 1 $ git branch <new-branch>
删除本地分支 1 $ git branch -d <branch>
删除远程分支 1 2 3 $ git push -d origin <branch> $ git push -d origin <branch1> <branch2> <branch3>
修改本地分支名称 1 $ git branch -m <old-branch> <new-branch>
修改远程分支名称 1 2 3 4 5 6 7 8 9 10 # 不能直接修改,步骤: 1、修改本地分支 2、删除远程分支 3、将新分支推上去 4、将新本地分支和远程相连 $ git branch -m <old-branch> <new-branch> $ git push -d origin <old-branch> $ git push origin <new-branch> $ git push --set-upstream origin <new-branch>
操作 查看仓库文件状态 查看未暂存文件变化 1 2 $ git diff $ git diff <path>
查看已暂存文件变化 1 2 $ git diff --cached $ git diff --cached <path>
添加暂存 1 2 $ git add . $ git add <path>
添加部分暂存 1 2 3 4 5 6 7 8 9 10 11 12 13 14 15 16 17 18 19 20 21 22 23 24 25 26 27 28 29 30 31 32 git add -p (git add --patch)命令,交互式暂存此文件的特定部分 这时有很多选项。 输入 ? 显示所有可以使用的命令列表: Stage this hunk [y,n,a,d,/,j,J,g,e,?]? ? y - stage this hunk n - do not stage this hunk a - stage this and all the remaining hunks in the file d - do not stage this hunk nor any of the remaining hunks in the file g - select a hunk to go to / - search for a hunk matching the given regex j - leave this hunk undecided, see next undecided hunk J - leave this hunk undecided, see next hunk k - leave this hunk undecided, see previous undecided hunk K - leave this hunk undecided, see previous hunk s - split the current hunk into smaller hunks ? - print help # y - 暂存此区块 n - 不暂存此区块 q - 退出;不暂存包括此块在内的剩余的区块 a - 暂存此块与此文件后面所有的区块 d - 不暂存此块与此文件后面所有的 区块 g - 选择并跳转至一个区块 / - 搜索与给定正则表达式匹配的区块 j - 暂不决定,转至下一个未决定的区块 J - 暂不决定,转至一个区块 k - 暂不决定,转至上一个未决定的区块 K - 暂不决定,转至上一个区块 s - 将当前的区块分割成多个较小的区块 e - 手动编辑当前的区块 ? - 输出帮助
通常,输入y暂存此部分,或者输入n跳过此部分就可以了
取消暂存 把对某个文件的修改添加到下次提交中
1 2 $ git restore --staged . $ git restore --staged <path>
丢弃改动 删除未跟踪文件 1 2 3 $ git clean -f $ git clean -fd $ git clean -nfd
提交 1 2 $ git commit -m 'message here' $ git commit -am 'message here'
修改上次提交msg 1 2 3 4 5 $ git commit --amend $ git commit --amend -m [message] $ git commit --amend [file1] [file2]
git commit –amend 就是解决一些很小的改动,使得你不想在重现创建一个commit而设定。如果你的commit已经push到了远程仓库,那么使用–amend修改commit后,git push时一定要使用 –force-with-lease 参数。否则就会报错:
1 2 3 4 error: 无法推送一些引用到 'https://github.com/×××/test.git' 提示:更新被拒绝,因为您当前分支的最新提交落后于其对应的远程分支。 提示:再次推送前,先与远程变更合并(如 'git pull ...')。详见 提示:'git push --help' 中的 'Note about fast-forwards' 小节。
修改上次提交的author 1 2 3 git commit --amend --author="hyp <hyp.712@163.com>" 执行后,:wq 保存退出即可。author修改为hyp。
修改前面某条的提交信息 1 2 3 4 git rebase -i HEAD~n 将需要修改的提交记录信息前的pick改为reword :wq 保存退出,会自动弹出修改comment页面,修改保存退出
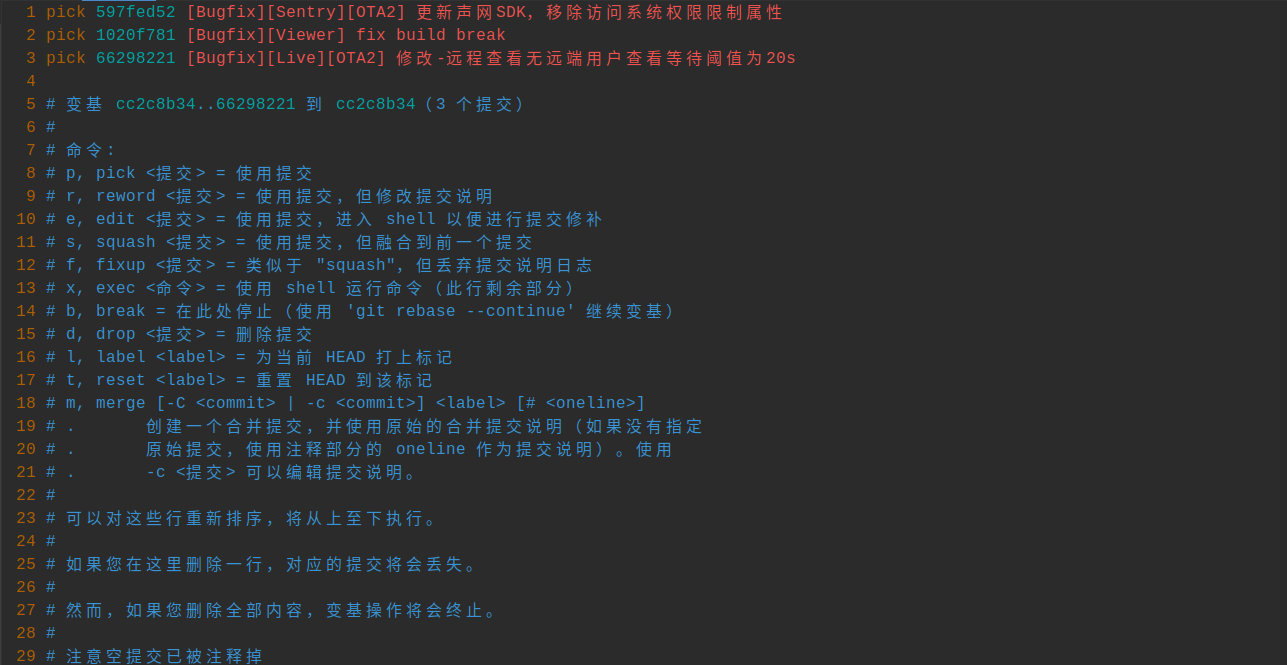
合并多个提交为一个 1 2 # 多笔提交合并 git rebase -i HEAD~n
使用git rebase -i HEAD~n合并多笔提交,使用前使用git log查看要合并的commit共有几笔,然后将n替换为具体数字
如: git rebase -i HEAD~6 //将最新的6笔提交合并,执行命令后会看到如下vim界面,(git editor不是vim的可以使用 git config –global core.editor vim 进行配置)
1 2 3 4 5 6 7 8 pick 508a46de Import translations. DO NOT MERGE ANYWHERE pick 0cc8cd9b CarSettings 适配MIAuto pick 4ad57b0b add some comments Signed-off-by: dominic < # 变基 0f0c6367..4ad57b0b 到 0f0c6367(3 个提交) # 命令: # p, pick <提交> = 使用提交 # ...
然后将第二行开始的pick改成s表示squash, 挤压到前一个提交, 保存退出后会进入一个新的Vim页面:
1 2 3 4 5 6 7 8 9 10 11 12 13 14 # 这是一个 3 个提交的组合。 # 这是第一个提交说明: Import translations. DO NOT MERGE ANYWHERE Auto-generated-cl: translation import Change-Id: I8760b7a4a1eeba58af7d68b0e4704c07187c7b28 # 这是提交说明 CarSettings 适配MIAuto Change-Id: I1a5885fef6f9345aaf36a4a09047dbfc265ac175 # 这是提交说明 add some comments Signed-off-by: dominic <hanguoliang1@xiaomi.com> Change-Id: Ia0883583bc962ab97e6ef0ea7bb966b21028c87a
然后在这个页面进行编辑合并后的提交信息,删除无用的信息,保存退出,如果成功可以看到successfully rebased and updated等文案提示。以上操作可以实现将多笔提交合并为一笔,这样在Gerrit系统review的时候就不用查看多笔提交了。
更新 下载远程仓库代码,但不合并到HEAD中:
将远程仓库代码合并到本地版本中:
1 2 3 4 $ git pull $ git pull = git fetch + git merge FETCH_HEAD $ git pull --rebase = git fetch + git rebase
强制拉取并覆盖本地代码
1 2 git fetch --all git reset --hard origin/master
合并 将分支合并到当前HEAD中:
将当前HEAD版本rebase到分支中:
退出rebase:
解决冲突后继续rebase:
在编辑器中手动解决冲突后,标记文件为已解决冲突
1 $ git add <resolved-file>
git rebase 与 git merge 区别 1 2 3 git merge会直接合并远端分支,有冲突时创建一个新的 commit 再提交。 git rebase 则是将本地的 commit 跟合并后有冲突的 commit 整合到一起,再提交到远端。这样可以保证 git 提交节点在一条线上,而不会因为冲突 commit 多出一个不在主流程线上的提交记录。
摘选 当你只需要部分代码变动(某几个提交)转移到另一个分支时,采用 Cherry pick(俗称:摘樱桃)。
1 2 3 4 5 6 7 8 9 10 11 12 $ git cherry-pick <commitHash> # 步骤 1.先从原分支查看git log获取待合并的 commitHash 2.然后checkout到目标分支 3.执行git cherry-pick commitHash,即可 git cherry-pick命令的常用配置项如下。 (1)-e,--edit 打开外部编辑器,编辑提交信息。 (2)-n,--no-commit 只更新工作区和暂存区,不产生新的提交。 (3)-x 在提交信息的末尾追加一行(cherry picked from commit ...),方便以后查到这个提交是如何产生的。 (4)-s,--signoff 在提交信息的末尾追加一行操作者的签名,表示是谁进行了这个操作。
撤销 放弃工作目录下的所有修改:
1.如果是撤销所有的已经add的文件:
2.如果是撤销某个文件或文件夹:
3.回退到上次提交
1 $ git reset --hard HEAD^
4.回退到上上次提交
1 $ git reset --hard HEAD^^
5.重置一个提交(通过创建一个截然不同的新提交)
6.将HEAD重置到指定的版本,并抛弃该版本之后的所有修改:
1 $ git reset --hard <commit>
7.已经commit还未push,撤销
1 2 3 4 5 git reset --soft HEAD^ #回退到上个版本 git reset --soft HEAD~3 #回退上上上一个版本 --soft #不删除工作空间的改动代码 ,撤销commit,不撤销git add file --hard #删除工作空间的改动代码,撤销commit且撤销add
这样就成功撤销了commit,如果想要连着add也撤销的话,–soft改为–hard(删除工作空间的改动代码)。
发布 1 2 3 $ git push $ git push <origin> <branch> $ git push origin develop
查看提交历史 1 2 3 4 5 6 7 8 $ git log $ git log --author="username" $ git log --oneline -[n] $ git log -p <path> $ git reflog
查看提交的内容 1 2 $ git show $ git show commitid
回滚到某次commit 1 2 3 4 5 6 7 回退命令: $ git reset --hard HEAD^ $ git reset --hard HEAD~3 $ git reset --hard commit_id 强推到远程: $ git push origin HEAD --force
获取完整commit id 1 2 3 4 5 6 git rev-parse HEAD 323f71b499929e5436bc38d08722b64a606c173c # 获取short commit id(如:bb4f92a) git rev-parse --short HEAD 323f71b499
存储 执行存储 1 $ git stash save "save message"
执行存储时,添加备注,方便查找,只有git stash 也要可以的,但查找时不方便识别。
查看存储列表 显示存储改动的文件 默认show第一个存储,如果要显示其他存贮,后面加stash@{$num},比如第二个 git stash show stash@{1}
显示存储改动的内容 默认show第一个如果显示其他存存储,命令后面加 stash@{$num} -p ,比如第二个:git stash show stash@{1} -p
应用某个存储 应用存储,但不会从存储列表中删除,默认使用第一个,即stash@{0},如果要使用其他追加 stash@{$num} , 比如第二个:git stash apply stash@{1}
应用存储且删除记录 应用存储,并从存储列表中删除,默认为第一个stash,即stash@{0},如果要应用并删除其他stash,命令:git stash pop stash@{$num} ,比如应用并删除第二个:git stash pop stash@{1}
丢弃存储 1 $ git stash drop stash@{num]
丢弃stash@{$num}存储,从列表中删除这个存储
删除所有stash 本地修改打patch 1 2 使用 `git diff` 命令创建补丁文件。这将比较两个提交之间的差异,并将其输出到一个文件中。 git diff > my_patch.patch
应用patch 1 2 3 请将补丁文件复制到该代码库的根目录。在目标代码库中,运行 `git apply` 命令以应用补丁: git apply my_patch.patch
标签 显示Tag列表 显示标签信息 1 2 3 4 5 6 $ git show v2.9_tag tag v2.9_tag Tagger: brooks <hyp712@163.com> Date: Mon Jul 19 21:06:45 2021 +0800 v2.9美颜
输出显示了打标签者的信息、打标签的日期时间、附注信息,然后显示具体的提交信息。
添加Tag 1 2 $ git tag <tagname> $ git tag <tagname> -m "messsage"
删除Tag 1 2 $ git tag -d <tagname> $ git push origin --delete <tagname>
发布标签: 1 2 3 $ git push origin v1.0 $ git push origin --tags
repo 使用说明 1.安装(推荐使用清华镜像版本) 1 2 curl https://mirrors.tuna.tsinghua.edu.cn/git/git-repo -o repo chmod +x repo
2.初始化 1 2 3 4 repo init –u URL [OPTIONS] # eg: repo init -u ssh://brooks@gerrit.office.cn:1000/platform/manifest.git
3.下载代码 1 repo sync [project name] #同步代码到本地
4.代码修改,上传 1 2 3 4 5 6 git add . git commit -s //进入提交日志编辑页面,编辑保存后退出 repo upload . //执行upload操作将代码提交到Gerrit以便进行审核 # 避免一次review有多笔提交 可以使用 commit --amend将最新的改动合并到上一笔的提交 git commit --amend
5.创建并切换分支

